📚 Glossary: your tool to standardize translations and guide the AI
The Glossary in Redokun helps your team maintain consistent terminology across all translation projects.
It ensures key terms are translated accurately and uniformly—whether you're working with internal teams or external vendors.
💡 Why Use the Glossary?
Using a Glossary has several key benefits:
- ✅ Consistency: Ensures your brand and technical terms are translated the same way across all documents.
- ⏱️ Efficiency: Reduces the time translators spend deciding how to translate common terms.
- 📣 Clarity: Helps avoid misunderstandings in specialized or industry-specific content.
- 🤖 AI Compatibility: Glossary terms are applied automatically in AI translation.
This makes the Glossary an essential tool for quality, speed, and scale.
❗ The Glossary feature is not available on all plans. Please check our pricing page to see if it's included in your subscription.
📄 What Is the Glossary?
A Glossary is a list of approved term translations. Each entry includes:
- A term in the source language
- Its approved translation in the target language
- An optional note with additional context
Glossaries are linked to specific language pairs (e.g., English > Italian).
How is the Glossary different from the Translation Memory?
🔴 ▶️ Watch this video to find out: Glossary vs. Translation Memory: What's the Difference?
🧠 Glossary and AI Translation
Redokun sends your Glossary terms as preferred translations to the AI engine during Pre-translate and AI suggestions.
While the engine usually applies these terms, we can't guarantee it will always do so—especially if it detects a mismatch in context. Still, this feature greatly increases the chance of consistent terminology in AI-generated translations.
👩💻 Use the Glossary in the Web Editor
As you translate:
- Terms with Glossary entries appear underlined in the source text.
- Green underline → Term is correctly used in translation.
- Yellow underline → Term is missing or incorrect.
- Hover over the underlined term to view the approved translation and note.
⚠️ Glossary Warnings in the Editor
If a confirmed translation doesn’t match the Glossary, Redokun shows a warning:
- Use the filter Show > With glossary warning to find these segments easily.

🔴 ▶️ Watch this video for a step-by-step walkthrough: How to Check Glossary Warnings
📬 Glossary Access and Sharing
Glossaries in Redokun are automatically shared within your team and with invited collaborators:
- Managers have full access. They can create, edit, import, export, and manage Glossaries for all language pairs.
- Translators can have access to view, create, edit, import, and delete entries for only the languages they are assigned to, if given access. In the Web Editor, they can:
- View glossary suggestions and notes
- Create and edit glossary entries directly inside the Web Editor (if given access)
- Receive warnings when their translation doesn't match a Glossary term
- Benefit from AI suggestions that aim to apply Glossary preferences
There's no need to manually share files. All collaborators work from a single, centralized Glossary—ensuring consistency across projects.
| Feature | Managers | Translators |
|---|---|---|
| Manage roles and access to the glossary | ✅ Yes | ❌ No |
| View Glossary entries | ✅ Yes | ✅ Yes |
| Create, edit, or delete entries | ✅ Yes | ✅ Yes* (if enabled) |
| Import Glossary (Excel) | ✅ Yes | ✅ Yes* (if enabled) |
| Export Glossary (Excel) | ✅ Yes | ❌ No |
| Delete a Glossary | ✅ Yes | ❌ No |
| Glossary suggestions in Web Editor | ✅ Yes | ✅ Yes |
| Create and edit glossary entries directly inside the Web Editor | ✅ Yes | ✅ Yes* (if enabled) |
| Glossary warnings for missing terms | ✅ Yes | ✅ Yes |
| AI uses Glossary as translation hint | ✅ Yes | ✅ Yes |
| Access is automatic when assigned to a project | ✅ Yes | ✅ Yes |
* Only if the manager grants edit access.
🧑🤝🧑 Granting access to translators
Managers and the Team Owner can control whether a translator can only view the Glossary or also edit it.
-
Go to Settings > Translators.
Find the translator you want to update.
In the TM and Glossary column, choose:
- View only → The translator can see Glossary entries.
- Edit access → The translator can add, edit, or delete entries.
⚠️ Only Managers and the Team Owner can change these permissions.
🛠️ Creating a Glossary
- Click Glossary in the top navigation.
- Click Create glossary.
- Select a source and target language.
- Click Create glossary to confirm.
❗ You can create one Glossary per language pair.
💡 Tips for Effective Glossary Use
- Include terms that are brand-specific, technical, or commonly misunderstood.
- Use the same language in the source and target fields for terms that must not be translated (e.g., brand names).
- You can add multi-word terms (e.g., "machine learning") to the glossary.
- Keep translations updated as your content evolves.
➕ Add a Term Manually
- Click Glossary in the top navigation.
- Click See details next to your Glossary.
- Click + Create single entry.
- Add the source term, translation, and an optional note.
- Click Create entry.
🔴 ▶️ Watch this video for a step-by-step walkthrough: Create Your First Glossary Entry
💡 You can add multi-word terms (e.g., "machine learning") to the glossary. Additionally, if you want a term to remain untranslated, you can set the translation to be the same as the source term.
📂 Import a Glossary from Excel
- Click Glossary in the top navigation.
- Open the Glossary and click Upload glossary.
- Download the Excel template.
- Fill in:
- Column A: Source term (max 80 characters)
- Column B: Target term (max 80 characters)
- Column C: Note (optional, max 250 characters)
- Click Browse files to upload.
- Click Continue to finish the import.
🔴 ▶️ Watch this video for a step-by-step walkthrough: Mass Upload Your Glossary Entries
💡 You can add multi-word terms (e.g., "machine learning") to the glossary. Additionally, if you want a term to remain untranslated, you can set the translation to be the same as the source term.
⚠️ Duplicate entries are skipped automatically.
✍️ Add a Glossary entry directly from the Web Editor
You can create new Glossary entries directly while translating in the Web Editor — without leaving your document. This option is available to Managers, and Translators with Edit access (set in Settings > Translators, under TM and Glossary).
- Select the term or phrase in the source sentence.
-
Click Add glossary entry in the popup menu.
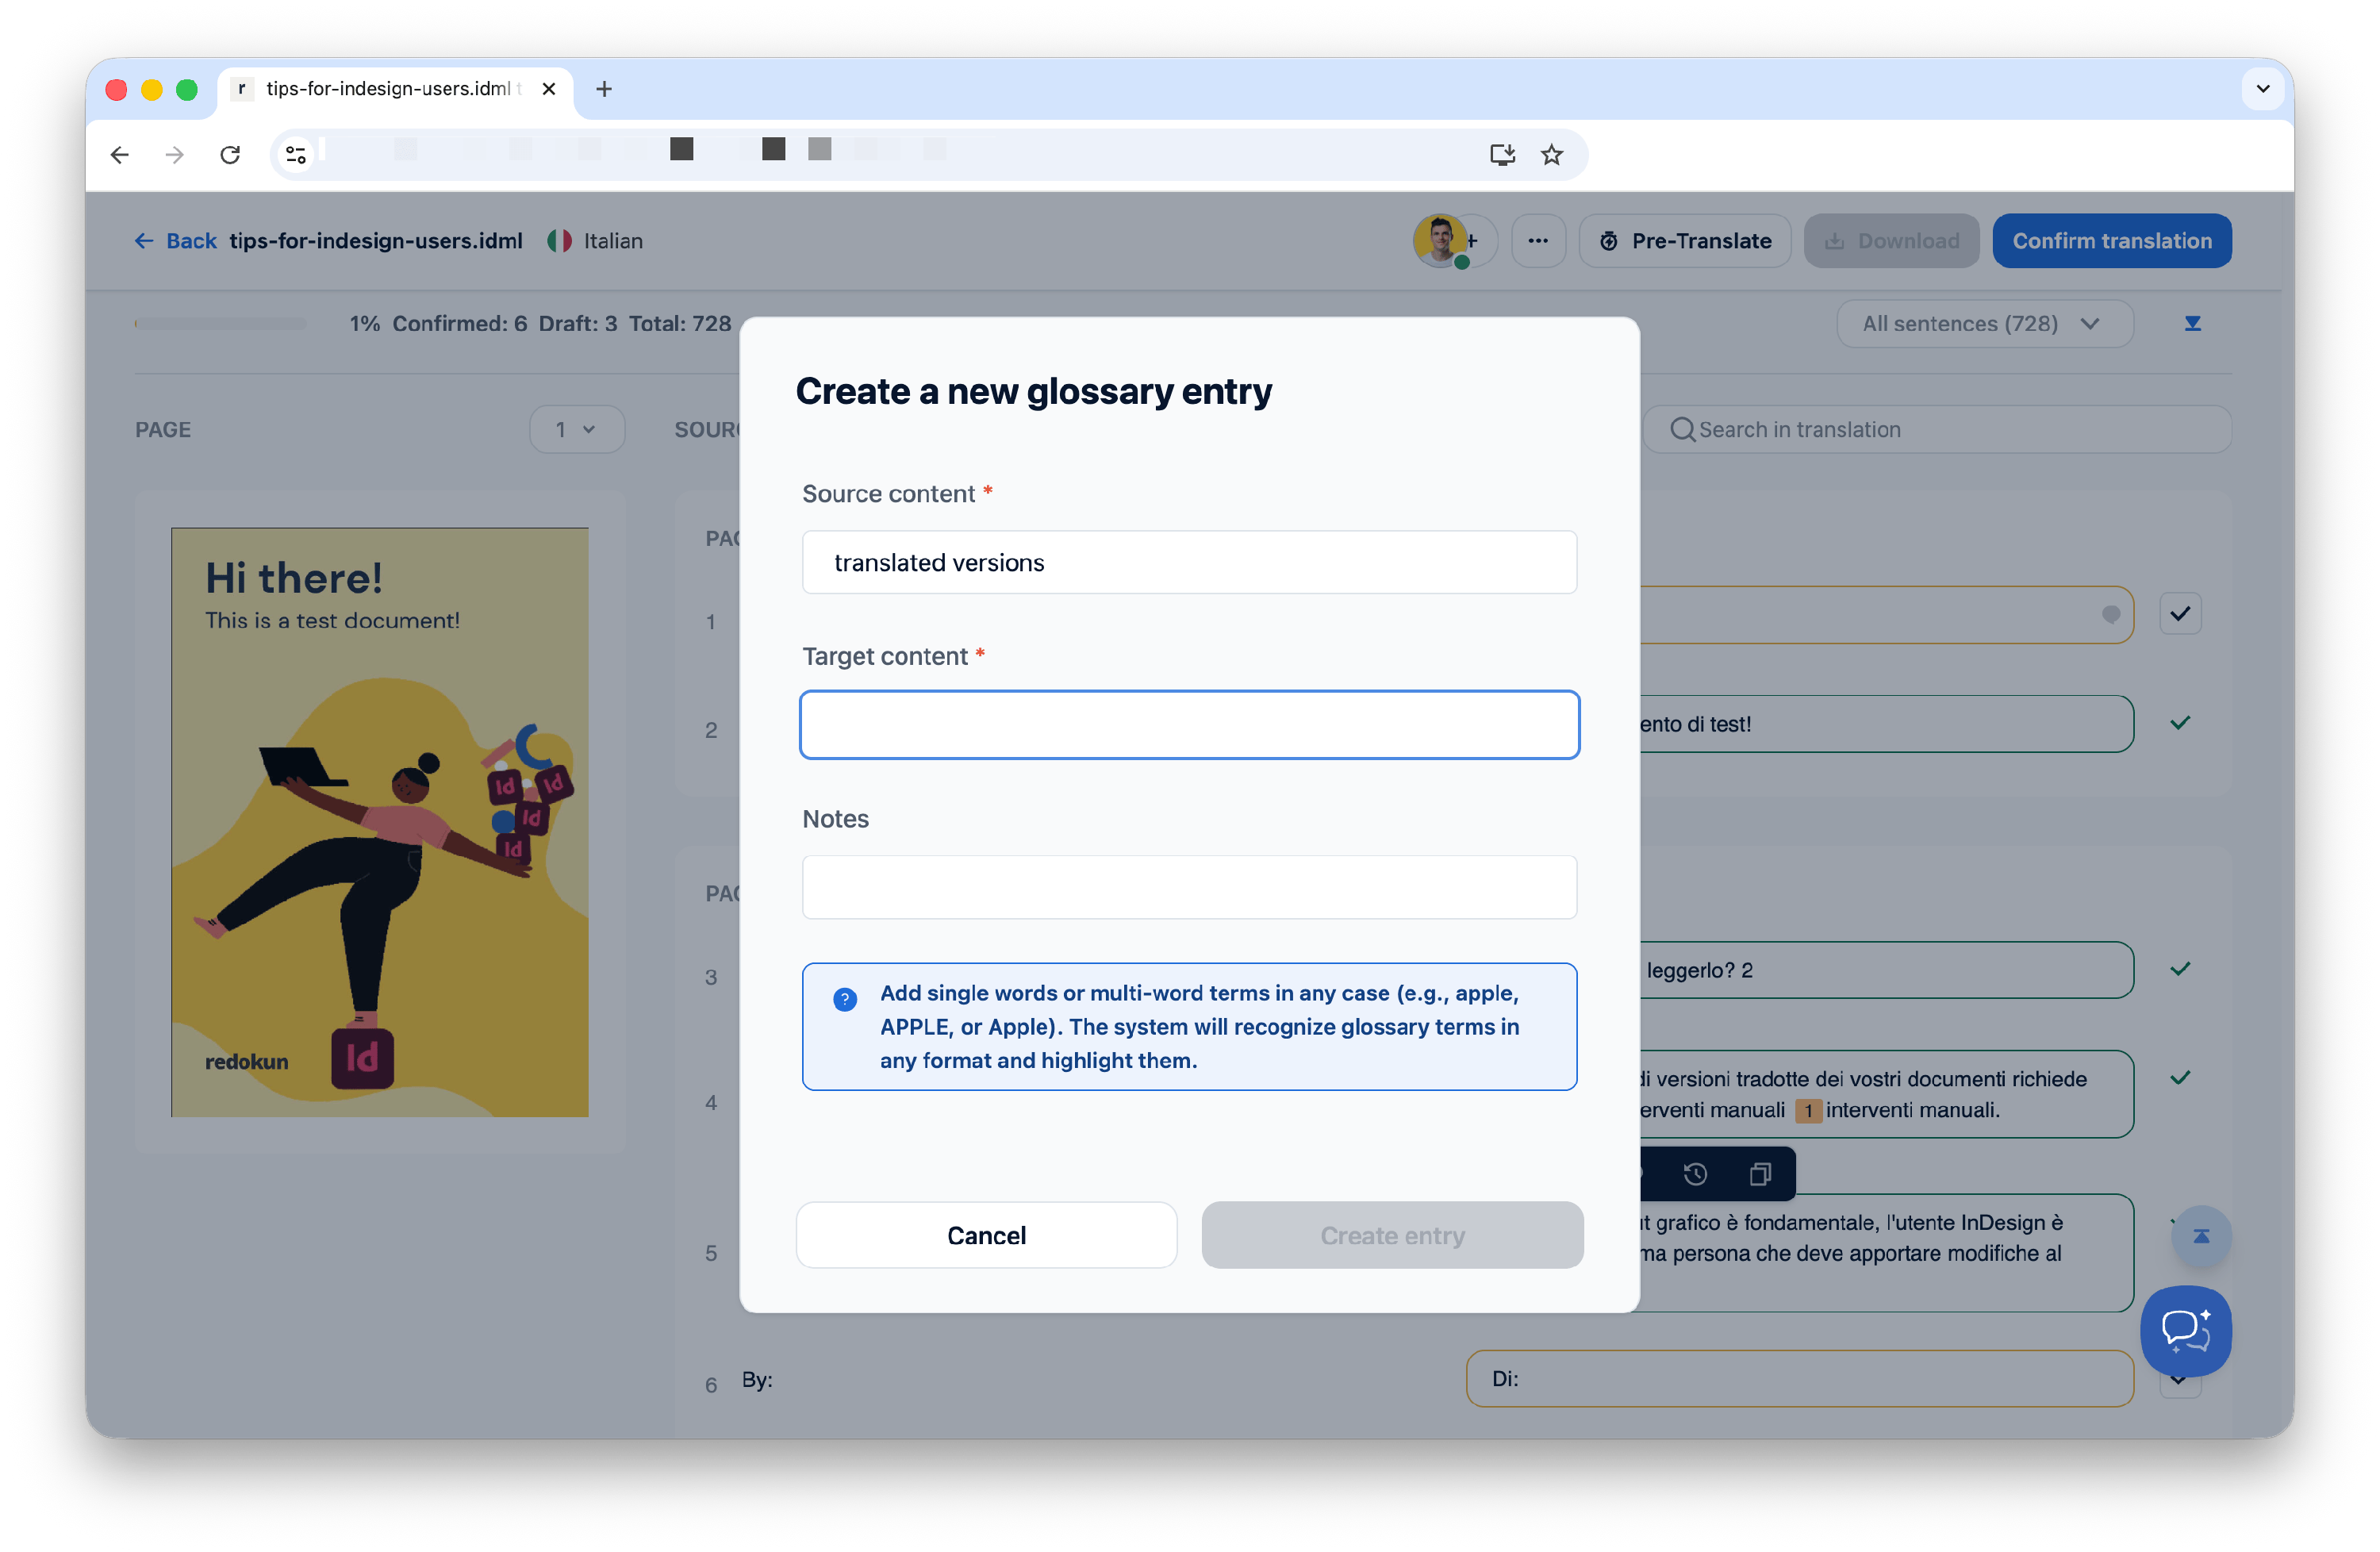
In the dialog:
- Source content (pre-filled from your selection).
- Add the Target content (the approved translation).
- Add Notes if needed (optional).
- Click Create entry to save.
Your new term is immediately added to the Glossary and highlighted across all documents for that language pair.
💡 Tip Use this shortcut to add terminology the moment you encounter it — especially technical terms or phrases you know you’ll reuse across documents.
📤 Export Your Glossary
- Click Glossary in the top navigation.
- Open the Glossary.
- Click Download to export all entries in Excel format.
⚠️ Only users with a Manager role can export Glossaries. Translator accounts do not have permission to perform this action.
If you have any questions or need further assistance, feel free to contact us at support@redokun.com.